Table of Contents
eCampus Calendar Functions
The eCampus calendar provides you with an overview of your courses and appointments. Each course session is linked to the related course page in the online catalogue (UniVZ) and Stud.IP. You can access the calendar by clicking the “calendar” register in the eCampus navigation menu.
Where do appointments come from?
The calendar lists all sessions of all courses for which you have registerted in Stud.IP or which you have pencilled into your timetable. You can also add personal dates and appointments of your own.
Enrolling in courses in Stud.IP
If you would like to register for courses in Stud.IP, please follow the instuctions provided in the Stud.IP help pages: http://docs.studip.de/help/2.1/en/ugoe/Basis/VeranstaltungenAbonnieren and http://docs.studip.de/help/2.1/en/ugoe/Basis.FAQVaAnmeldung. The corresponding sessions will then be displayed in your eCampus calendar.
Pencilling locked courses into your calendar
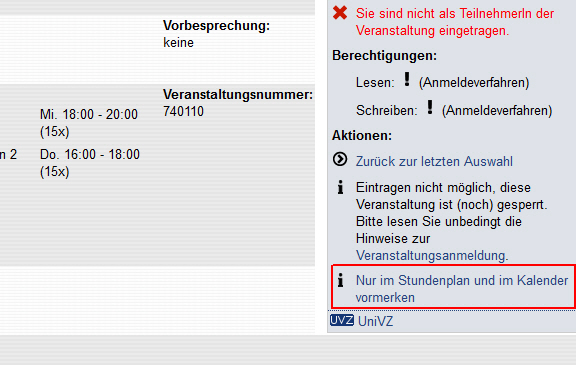
If a course is still locked in Stud.IP, you can still pencil its sessions into your eCampus timetable. To find out why a particular course might still be locked in Stud.IP, please consult the Stud.IP help page (http://docs.studip.de/help/2.1/en/ugoe/Basis.FAQVaAnmeldung). To pencil in a locked course, simply click on the [Just pencil in the timetable] link.
Adding personal dates and appointments
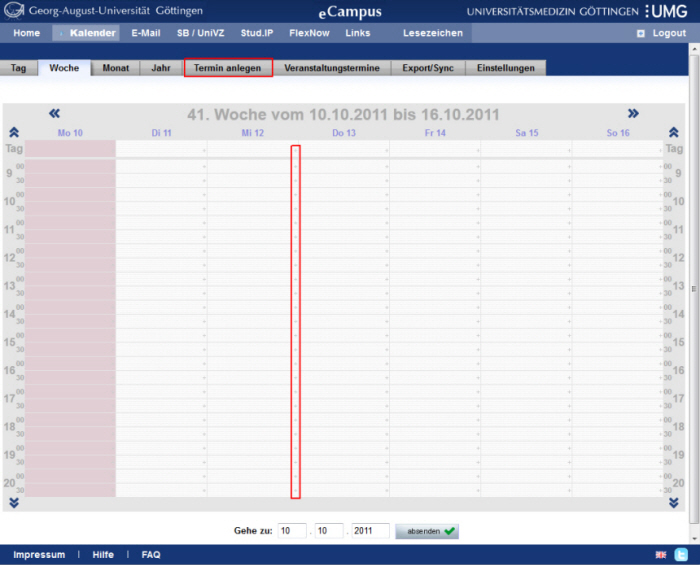
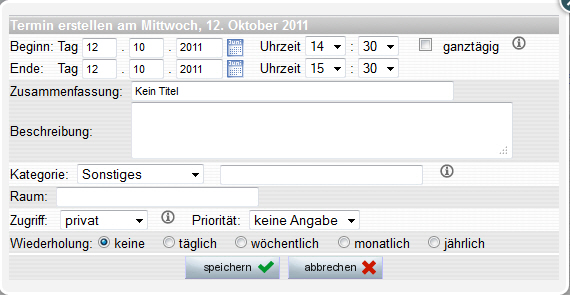
In addition to dates which are automatically added to your calendar by Stud.IP, you can also create new appointments. Just click the [Termin anlegen] menu register or the + symbol in any calendar cell.
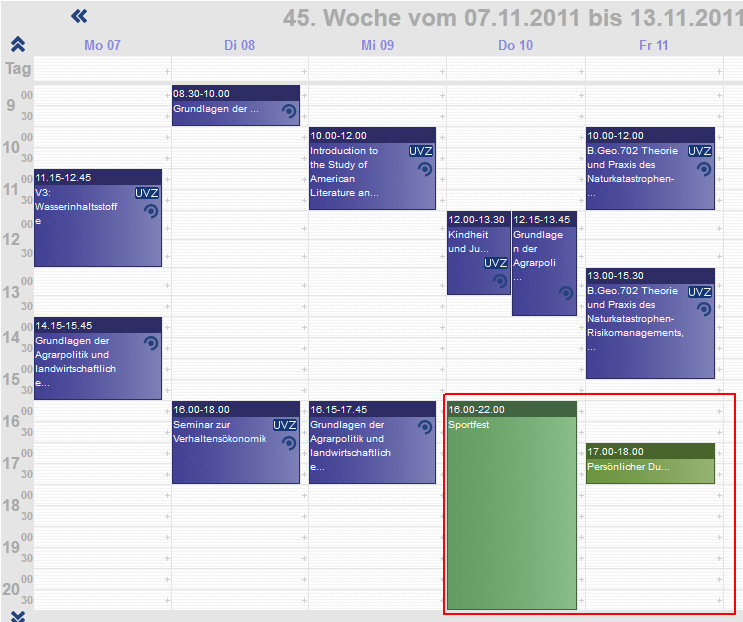
A dialogue will open, into which you may enter the details of your appointment. For example, you may specify starting and ending time, assign a category to your appointment, add a room and determine wheteher the appointment is a recurring one or once-only. Once you have saved, the appointment is added to your calendar. Its colour corresponds with the assigned category.
Please note that all eCampus calendar events are also displayed in the Stud.IP planner and vice versa.
Removing personal appointments
You can delete peronal appointments by clicking on them in the calendar and then clicking the [Delete] button in the popup dialogue.
Hiding courses / removing locked courses from your calendar
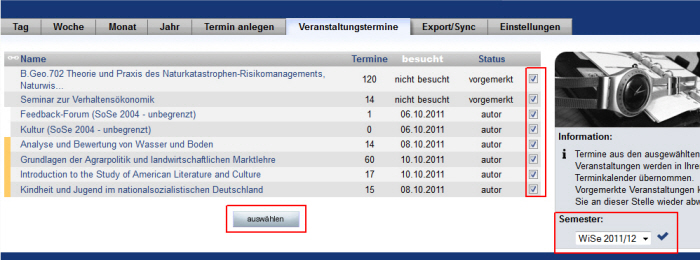
If you no longer want sessions of classes, in which you have enrolled and wish to stay enrolled in, to show on your eCampus calendar, you can remove the check next to that class in the [class sesions
Wenn Sie Veranstaltungen, in die Sie sich eingetragen haben und in denen Sie eingetragen bleiben wollen, nicht mehr auf Ihrem eCampus Kalender sehen möchten, dann entfernen Sie bitte unter [Veranstaltungstermine] den Haken der entsprechenden Veranstaltungen. Auf diese Weise können Sie auch die gesperrten Veranstaltungen, die Sie sich vorgemerkt haben, wieder von Ihrem Kalender entfernen. Beachten Sie, dass Sie das Semester wechseln müssen, wenn sie Veranstaltungen aus den Vorsemestern ausblenden möchten.
Event details and links.
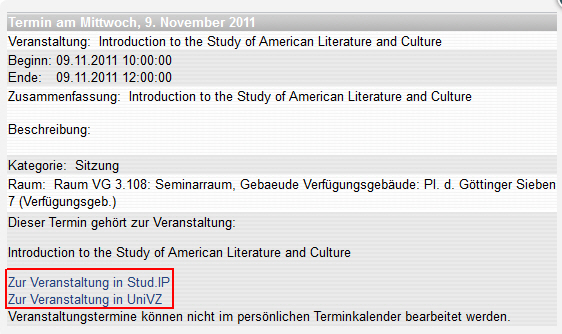
When you click on an event in the calendar, a window with details of the event is displayed. In this detail window you can see basic information about the event (times, descriptions, location, etc.) at a glance and you can also directly access the event in the corresponding system via the links [To event in Stud.IP] and [To event in UniVZ].
Likewise, you can also access the event in Stud.IP or UniVZ via the corresponding icons, without calling up the detail window.
For personal appointments, the settings can be changed or the appointment can be deleted in the detail window of the appointment.
Views and settings
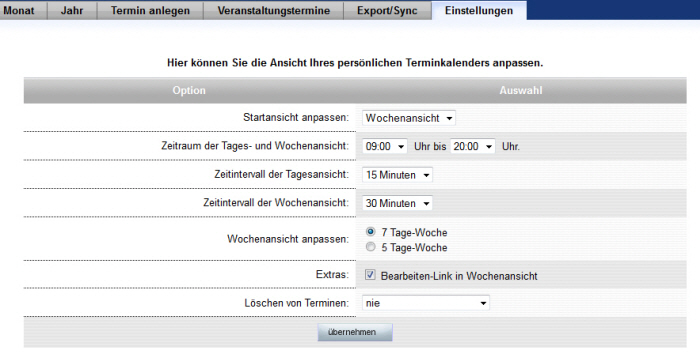
In the calendar, a day, week, month and year view are available, whereby the week view of the current week is always displayed when the calendar is called up. You can change this and other settings under the menu item [Settings].
Also, you can jump directly to a specific week (month, etc.) from the current view by entering a date in the [Go To] input boxes below the calendar and clicking the [Submit] button.
Note that the icons with the links to the event in Stud.IP and UniVZ are only displayed in the daily and weekly view due to space limitations. In the year view, the display is simplified to the extent that only the days on which events exist are highlighted. To see the dates themselves, please switch to another view.
Export/synchronize calendar as ical
If you are using an event calendar application in which you can integrate external calendars via ical URL (e.g. Outlook, Google Calendar) or if you would like to have your event dates displayed on your smartphone (e.g. Iphone), you can use the export/sync function of the eCampus calendar.
To do this, enter the URL (A) given on the Export/Sync dialog as an external calendar into your appointment calendar program or smartphone. (If needed, refer to the manual of your program or smartphone for detailed instructions on how to include an external calendar) However, you cannot make changes to the eCampus calendar appointments from an external program, it is read-only access to your appointments.
Create new URL
The URL (A) is a randomly generated address that can be used to access all events. If you ever want to change this URL, you can use the link [Generate new address] (B). This will create a new random URL for external access to the calendar and invalidate the old one. Please note that in all programs where you already use the old URL, you must now enter the new URL so that the appointments will continue to be displayed. Regenerating the URL can be useful if your calendar URL has accidentally fallen into the hands of unauthorized persons (e.g. by losing the smartphone).
Send URL by mail
To make typing the URL more comfortable on small smartphone keyboards, eCampus Calendar offers the option to send the URL to an email address (C). You can then retrieve the email with your smartphone, copy the URL and paste it in the appropriate place without having to type the cryptic characters.
Only export
The methods described above involve linking your external program or smartphone to the eCampus calendar. Which means that all appointment changes are automatically passed on to the external program via an internet connection. If you do not want this, you can also export and use the appointments as *.ics files. To do this, simply right-click on the URL (A) in the browser and select [Save target as…] to save a *.ics file to your hard drive.


