Table of Contents
eduroam (Linux)
This is the manual to configure eduroam on Linux systems. The configuration can be done with different tools.
eduroam CAT
The easiest way to configure the eduroam network is to use the eduroam CAT (Configuration Assistant Tool). For students and employees of the Göttingen University, it can be downloaded here. The python script has to be executed via the terminal. After opening the terminal execute the script by typing python FILE LOCATION, so e.g. python3 Downloads/eduroam-linux-GWDG_Goettingen-University_of_Gottingen_and_GWDG.py. You will be asked for you username which is your university e-mail-adress and your password.
Basic configuration
- security: WPA2 Enterprise
- legitimacy: Protected EAP (PEAP)
- username: firstname.lastname@stud.uni-goettingen.de
- CA-certificate: T-Telesec Global Root Class 2
- inner Legitimiacy: MSCHAPv2
- anonymous identity: eduroam@gwdg.de
The username may vary depending on the user group. It corresponds to the e-mail address of the respective account.
Network-Manager
The Network-Manager is able to manage network connections on different Linux distributions, e. g. Ubuntu, Linux Mint, Fedora und openSUSE. The control takes place via customized user interfaces.
Gnome Networkmanager
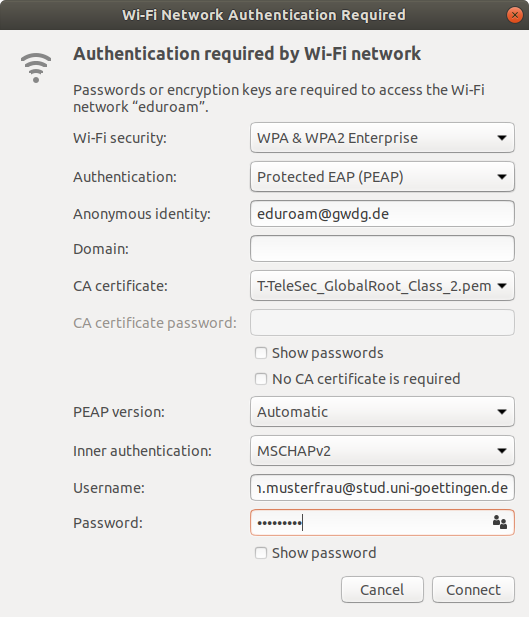
 At first, choose “eduroam” in the list of all WiFi networks available. The configuration is as shown in the information box above and in the image on the right hand side respectively.
Depending on the distribution, the CA certificate “T-Telesec Global Root Class 2” may be at different locations in the file system. In Ubuntu, it is located in /etc/ssl/certs/. Alternatively you can download it here and choose it as a CA certificate afterwards.
Finally, fill in the sections username and password and click on “Connect”. A connection to eduroam will be established.
KNetworkManager
 KNetworkManager manages all networks on KDE.
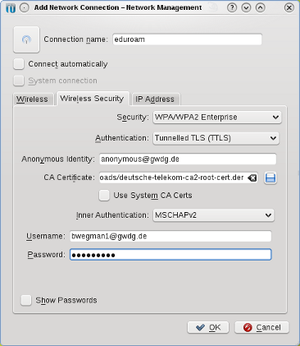
The configuration is as shown in the information box below and in the image on the right hand side respectively.
Depending on the distribution, the CA certificate “T-TeleSec Global Root Class 2” may be at different locations in the file system. Mostly it is preinstalled and it is sufficient to tick “Use Systems CA Certs”. Alternatively you can download it here and choose it as a CA certificate afterwards.
Click “OK” to save and to establish a connection. It might be the case that the programme “KWallet” asks for a rule to handle your passwords.
netcfg
As a starting point the sample configuration “wireless-wpa-configsectio” can be used. Usually the configuration file only needs to be changed in the section “CONFIGSECTION”, containing the following information:
CONNECTION='wireless'
INTERFACE=wlan0
SECURITY='wpa-configsection'
IP='dhcp'
CONFIGSECTION='
    ssid="eduroam"
    key_mgmt=WPA-EAP
    ca_cert="/pfad/zum/deutsche-telekom-root-ca-2.crt"
    anonymous_identity="anonymous@gwdg.de"
    identity="vorname.nachname@stud.uni-goettingen.de"
    password="passwort"
    phase2="auth=MSCHAPV2"
'
The fields password and identity as well as the path to the CA certificate Deutsche Telekom Root CA 2 in ca_cert need to be adjusted. It recquires root rights to establish a connection and to configure this connection.
In doing so, the password will be saved unencrypted on your hard drive!
wpa_supplicant
Normally the configuration and establishing a connection takes place with root rights in the file “/etc/wpa_supplicant.conf” where a new block will be inserted as follows.
The fields password and identity as well as the path to the CA certificate Deutsche Telekom Root CA 2 in ca_cert need to be adjusted.
network={
    ssid="eduroam"
    key_mgmt=WPA-EAP
    ca_cert="/pfad/zum/deutsche-telekom-root-ca-2.pem"
    identity="vorname.nachname6@stud.uni-goettingen.de"
    password="passwort"
    eap=TTLS
    proto=WPA
    anonymous_identity="anonymous@gwdg.de"
    phase2="auth=MSCHAPV2"
}
In doing so, the password will be saved unencrypted on your hard drive!
By doing a request with wpa_supplicant -iwlan0 -Dwext -c/etc/wpa_supplicant.conf it is able to start the dial-up. In doing so, wpa_supplicant remains in the foreground. You have to configure your IP address separately, e. g. via using dhcpd.
